
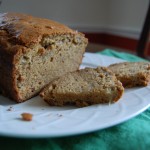
A couple weeks ago I mentioned I wanted to try this recipe for Sourdough Bread. I did and it is wonderful! It takes a while, but it is very easy. No kneading is necessary in this sourdough recipe. Maybe Jenny can explain the science behind the sourdough. I have made the recipe twice. Once as the recipe instructs with white flour and the second time with 2 whole wheat cups out of the 6 cups of flour. Both times were great. The whole wheat didn’t weigh down the bread at all. I think next time I may try even more.
 The web site where I found the recipe was a little hard to follow while making the bread. So here is the condensed version:
and
Don’t forget to enter our giveaway!!
Sour Dough Bread
(cut and pasted from http://www.instructables.com/id/Sourdough-Bread/)
Ingredients
- Start by gathering all your ingredients. You’ll need the following things:
- 1 c. sourdough starter*
- 6 c. bread flour**
- 3 c. water
- 2 t. salt
- 1/4 t. yeast
*information on sourdough starter is in the next step
** Bread flour works best, but all-purpose flour will also work out just fine. If you want a whole wheat loaf, you can substitute whole wheat flour in a roughly 1 to 1 proportion. I personally find that a loaf made of 100% whole wheat flour, especially flour I grind myself, a little too heavy for my family. Using 50% home-ground whole wheat flour produces a nice loaf. Some of the rise times might need to be adjusted if your kitchen is cool.
Directions
Phase 1 – mix water and starter
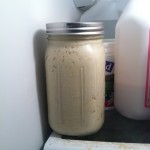
Start by pouring two cups of room temperature tap water (not warm) into a very large bowl. Scoop out 1 c. of sourdough starter and stir it in. The starter likes being stirred up and aerated, so stir or whisk it together vigorously.
Take a moment to replenish your starter right now. If you’re making one batch of sourdough and using one cup of starter, replenish with 1/2 c. water and 1 c. flour. If you’re making two batches at once (which is what I usually do) you’ll replenish the starter with 1 c. water and 2 c. flour. The proportion of water to flour is usually 1 part water to 2 parts flour. If the starter gets too thick or too thin, you can adjust according.
Add yeast and flour
Stir in 1/4 t. yeast and 3 c. bread flour. Mix until smooth.
It’s been brought to my attention that I should not need any commercial yeast at all if I’m using yeast-rich sourdough starter. That’s true for me in the summer when my kitchen is 85 degrees. In the winter, my ambient kitchen temperature often stays around 55 degrees and I use that 1/4 t. for a little boost. Using only 1/4 t. means that the yeast flavor doesn’t dominate the sourdough flavor.
Phase 2: Add more water and the salt
Stir in the 3rd cup of water. Add the salt and mix thoroughly. The salt will slow down the fermentation. This is a good thing. The longer the sourdough takes to rise, the more sour the bread will be. If you’re not comfortable with this much salt, you can reduce the amount. It will affect the flavor though, so experiment a little.
Add the last of the bread flour
Stir in the remaining 3 c. bread flour. Stir until completely mixed. You do NOT need to knead this bread. The sourdough starter will actually do that for you. All those little yeasts get rowdy and over time inspire gluten fibers to form. This gives the bread its unique sourdough texture.
Cover and let the sourdough do its work
Cover the bowl of dough with a towel and set aside in a draft-free place. Don’t be jiggling the dough while it’s doing its thing. Leave it alone. And then leave it alone some more. The bread dough needs to just sit and do its thing for 12-15 hours. When it’s done, the dough will be bubbly and BIGGER than it was at the start. If the bubbles start to pop, then it’s gone too long. It doesn’t hurt to peek at it from time to time.
Sometimes you can see a little bit of clear liquid accumulating around the edges of the dough. This is actually a by-product of the fermentation process of the sourdough yeasts. The old miners called that hooch!
Now, let me make some disclaimers. First, if your kitchen is particularly warm or this is the middle of the summer, you might need to shorten this first rise time. If you notice the bubbles popping, then the dough ready for the next step. You CAN slow things down by refrigerating the dough at any point.
Turning the Dough Out
Now it’s time for the step that we call “turning out the dough.” Start by sprinkling some more flour across the top of the dough. Then plunge your hands into the flour bin and get thoroughly floured up. Start by sweeping your hand around and under the dough in the bowl. Go stick your hand in the flour bin again. Scoop the dough up and over. Get a little more flour on your hands. Scoop and roll the dough over. It shouldn’t take too many scoops and sweeps before the dough starts feeling elastic and practically alive! Turn the dough out onto a well-floured surface OR a large piece of plastic wrap that has been sprayed with nonstick spray.
Now comes the less-fun part: washing out the bowl. I use a plastic grocery club card to scrape all the bits of dough off the bowl. After washing and thoroughly rinsing the bowl, dry it completely.
Getting the dough ready for the second rise
The dough is ready for its second rise. You have two options. You can either oil the inside of the bowl so that the dough will roll out easily when it’s time to put it in the oven.
Or, if you’re feeling slightly less virtuous and green, you can just put the dough on the plastic wrap into the bowl. The dough will come off the plastic wrap easily because you sprayed a nonstick spray on it, remember?
Cover and Let the Dough REST again
Yes, we’re letting the dough rest. The sourdough still has not finished creating gluten fibers, so it needs a few more hours. Cover the bowl with a towel and set in a draft-free area. How long the dough rests will depend a lot on the room temperature. If your kitchen is fairly cool, you should let the dough rest another 4-5 hours. If your kitchen is warm, you’ll want to keep an eye on things and consider baking the bread after only 2-3 hours.
Pay attention to the dough during this stage. The thing that you do NOT want is for the starter to consume all the available fuel (flour) in the dough. If that happens, the dough will collapse in on itself after rising. If you see signs of the dough starting to collapse–that means the bubbles are bursting and the center of the dough begins to sag a little–it’s time to hustle that bread into the oven.
Preheat the Pans
The type of pan you use is actually very important. The very best option is a heavy cast iron dutch oven with a cover. I also use a covered roasting pan made by Pampered Chef that I got from a thrift store for $7.
The key is the cover. You’ll need a cover to create a miniature steam oven for the first 30 minutes of baking. I use pans that are 8 – 12 quarts in size. The pan should be at least 8 quarts in size. If you want to divide the bread into two smaller loaves because you only have smaller pans, everything stays the same in terms of baking time.
Another important feature to pay attention to is the sides. The sides of the pan need to be straight or tapering out. If the top of the pan is narrower than the widest part of the pan, don’t use that that pan! You’ll never get the loaf out.
Pyrex dishes work very well for this method of bread-making with one important caveat. If you set the heated pyrex on a surface with ANY moisture on it at all, the pyrex will explode, sending shards of glass everywhere. I blew up some of my best casserole dishes before I settled on my cast iron.
Turn your oven on to 450 degrees and stick the pan and cover in to preheat for 30 minutes.
FINALLY baking the bread
Pull the pan out of the oven, being very careful not to burn yourself. Sprinkle corn grits or oatmeal on the bottom of the pan. This will keep the bread from sticking.
Gently roll the dough out of the bowl and into the pan. Pop the cover back on and put it in the oven. Bake at 450 degrees for 30 minutes.
Then remove the cover and bake for an additional 15 minutes. This will brown up the top of the bread. After a total of 45 minutes, you’ll carefully take the bread out of the oven and tip it out onto a cooling rack.
IF you can resist sneaking a slice right away, you’re a far better individual than anyone who lives in MY house.


Pingback: Cauilflower Soup | Two Clever MomsTwo Clever Moms
Pingback: Can You Love a Sourdough Starter? | Two Clever Moms